
| 과 제 명 | 국문 | 파이썬을 통한 AdaBoost-Samme 알고리즘 구현 |
| 영문 | Implementation of AdaBoost-Samme Algorithm via Python | |
| 이 름 | 김다예 | |
1. 과제 개요
가. 과제 선정 배경
최근 필자는 공모전 주제로써 ‘당뇨병 발병 예측 모델 구현’프로젝트를 진행하였다.
가장 Accuracy 및 AUC 값이 높은 모델을 찾고자, 총 13개의 머신러닝 Classifier 및 MLP 모델을 적용 및 분석해보았고, 각 모델에 대해 gridSearch 및 HyperParameter Tuning을 하며 score(=AUC)을 비교하였다. 결과적으로, 비교한 모델 중 가장 성능이 좋았던 것은 Samme 알고리즘이 적용된 Adaboost Classifier였다. 필자는 AdaBoost Classifier의 적용 방법만 알 뿐, 상세한 알고리즘에 대한 내용에는 무지하였기에 알고리즘을 구현해보는 이번 과제로서 Adaboost Classifier를 조사하고, 실제 구현해보기로 하였다.
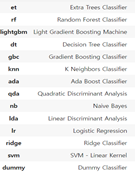
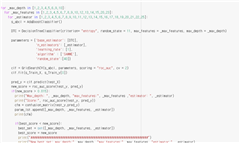
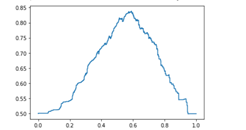
그림1.비교한 Classifier 목록/ 그림2. Adaboost에서 최적의 Parameter를 찾는 과정/ 그림3. Threshold에 따른 AUC값의 변화
나. 과제 주요 내용
1) Boosting 및 AdaBoosting 대해 조사한다.
2) Samme 알고리즘의 의사코드를 확인하고, 설명한다.
3) 파이썬으로 AdaBoost-samme 알고리즘을 구현한다.
4) 구현된 AdaBoost 알고리즘을 실제 적용해보고, 결과를 분석한다.
2. 알고리즘 조사 및 설명
가. Boosting 란 무엇인가?
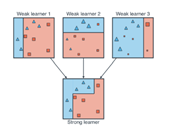
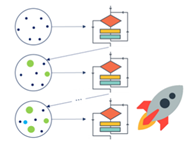
• 매우 단순한 learning 모델을 여러 개 사용하여 성능이 매우 좋은 모델 구축
• 단순한 learning 모델: 무작위 선택보다 성능이 약간 우수한 weak learner
• 무작위 선택보다 약간 우수한 weak learner를 여러 개 결합하는 앙상블 방식
• 모델 구축 시 순서를 고려
• 각 단계의 weak learner는 이전 단계 weak learner의 단점을 보완
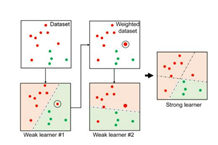
나. AdaBoosting 란 무엇인가?
• 이전 단계 weak learner의 단점을 보완하는 새로운 weak learner를 순차적으로 구축
• 매 단계에서 모든 관측치의 Weight를 업데이트 하는 방식으로 학습
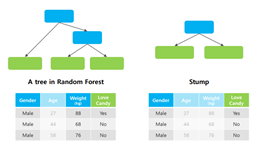
• Weak learner: 하나의 node와 두 개의 leaf로 구성된 stump
• Random forest의 tree와 달리 하나의 stump는 하나의 변수만 사용
• Stump가 잘 분류/예측하지 못하는 관측치는 이후 생성될 stump에서 크게 고려함
• 순차적으로 구축된 stump가 최종적인 분류 및 예측 결과에 미치는 영향은 모두 다름
다. Samme 의사코드 및 설명
Adaboost 기법에는 Samme, Samme.R 의 두가지 알고리즘이 있다.
이번 과제에서는 Samme알고리즘을 구현할 예정이다.
다음은 Samme 알고리즘의 의사코드이다.

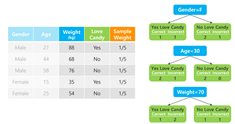
1) Selecting Stump
• 초기 Sample weight는 모든 관측치에 동일한 값 부여
• Sample Weight는 stump 구축에 사용된 각 관측치의 영향력을 의미
• 각 변수(feature)애 대해stump생성(변수가 3개라면 stump도 3개)
• Gini Index가 가장 작은 stump를 해당 단계의 weak learner로 사용

2) How much say this stump
• 선택한 weak learner가 최종 예측값에 얼마나 큰 영향력을 행사하는지 파악
(최종적인 분류 및 예측 결과에 대한 해당 stump의 영향력)

• 위의 식에서 Total error = 잘못 분류된 관측치의 sample weight총 합
3) update sample weight
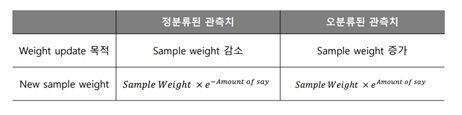
• Stump의 분류 결과를 반영하여 sample weight 업데이트
• Sample weight를 업데이트하여 이후 생성되는 stump가 오분류된 관측치에 집중하게 함
• 업데이트 된 Sample weight를 사용해 다음 단계의 stump를 구축하기 위한 새로운 dataset 생성
• 생성된 dataset은 새로 생성될 stump가 직전 stump에서 오분류된 관측치에 더욱 집중하게 함
• 이후 다시금 개별 관측치의 weight와 stump의 영향력을 순차적으로 계산 및 sample weight 업데이트를 반복하며 학습
• 최종적으로 amount of say의 합을 통해 classification
3. Samme 알고리즘 구현 via 파이썬
가. Samme 알고리즘(Adaboost모델) 구조 설정
Class DecisionStump : Stump를 만드는 Class -> 이후 Adaboost class에서 이용
def __init__(self) : HyperParameter 설정 (polarity, Feature_idx, Threshold, alpha)
def predict(self, X) : 예측값을 반환하는 함수
return predictions
Class Adaboost
def __init__(self, n_clif=5) : HyperParameter 설정 (n_clf, clfs)
def fit(self, X, y) : train_X_data, train_y_data를 받아 fit 하는 함수
def predict(self, X) : 예측할 dataset을 받아, 예측된 y값을 반환하는 함수
return y_pred
나. 알고리즘 구현
class DecisionStump:
def __init__(self ):
self .polarity = 1
self .feature_idx = None
self .threshold = None
self .alpha = None
def predict (self , X ):
n_samples = X.shape[0]
X_column = X[:, self .feature_idx]
predictions = np.ones(n_samples)
if self .polarity == 1 :
predictions[X_column < self .threshold] = -1
else :
predictions[X_column > self .threshold] = -1
return predictions
class Adaboost:
def __init__(self , n_clf =5 ):
self .n_clf = n_clf
self .clfs = []
def fit (self , X , y ):
n_samples, n_features = X.shape
# 가중치를 1/N으로 초기화
w = np.full(n_samples, (1 / n_samples))
self .clfs = []
# classifier 를 통해 반복함
for _ in range (self .n_clf):
clf = DecisionStump()
min_error = float ("inf")
# greedy search 를 통해 최상의 임곗값 확인
for feature_i in range (n_features):
X_column = X[:, feature_i]
thresholds = np.unique(X_column)
for threshold in thresholds:
# polarity = 1 로 예측
p = 1
predictions = np.ones(n_samples)
predictions[X_column < threshold] = -1
# Error = 오분류된 Sample weight의 합
misclassified = w[y != predictions]
error = sum (misclassified)
if error > 0.5 :
error = 1 - error
p = -1
# 최고의 성능을 내는 결과값을 저장함
if error < min_error:
clf.polarity = p
clf.threshold = threshold
clf.feature_idx = feature_i
min_error = error
# alpha 계산
EPS = 1e-10
clf.alpha = 0.5 * np.log((1.0 - min_error + EPS) / (min_error + EPS))
# 예측값 계산 및 weight 업데이트
predictions = clf.predict(X)
w *= np.exp(-clf.alpha * y * predictions)
# weight 값 정규화
w /= np.sum (w)
# classifier 저장
self .clfs.append(clf)
def predict (self , X ):
clf_preds = [clf.alpha * clf.predict(X) for clf in self .clfs]
y_pred = np.sum (clf_preds, axis=0 )
y_pred = np.sign(y_pred)
return y_pred
4. 구현된 Samme 알고리즘 실제 적용
가. Test 환경 설명
• Dataset : sklearn에서 기본적으로 제공하는 breast_cancer() dataset을 이용함
• Score : Accuracy를 기준으로 측정
• Trainset, Testset비율 : ‘8:2’ 로 Split
• n_clf : 5로 설정함
나. Test Code
1) 직접 구현한 Adaboost를 통한 Test
if __name__ == "__main__":
from sklearn import datasets
from sklearn.model_selection import train_test_split
def accuracy (y_true , y_pred ):
accuracy = np.sum (y_true == y_pred) / len (y_true)
return accuracy
data = datasets.load_breast_cancer()
X, y = data.data, data.target
y[y == 0 ] = -1
X_train, X_test, y_train, y_test = train_test_split(
X, y, test_size=0.2 , random_state=5
)
# 5 weak classifiers를 이용한 Adaboost Classifier (구현한 모델 이용)
clf = Adaboost(n_clf=5 )
clf.fit(X_train, y_train)
y_pred = clf.predict(X_test)
acc = accuracy(y_test, y_pred)
print ("Accuracy:", acc)
• Test set Accuracy: 0.9736842105263158
2) Sklearn Labrary 에서 제공하는 Ababoost를 통한 Test
def accuracy (y_true , y_pred ):
accuracy = np.sum (y_true == y_pred) / len (y_true)
return accuracy
data = datasets.load_breast_cancer()
X, y = data.data, data.target
y[y == 0 ] = -1
X_train, X_test, y_train, y_test = train_test_split(
X, y, test_size=0.2 , random_state=5
)
# 5 weak classifiers를 이용한 Adaboost Classifier (sklearn 모델 이용)
model = AdaBoostClassifier(n_estimators=5 , random_state=42 )
model.fit(X_train, y_train)
y_pred = model.predict(X_test)
acc = accuracy(y_test, y_pred)
print ("테스트 세트 정확도 : ", acc)
• Test set Accuracy: 0.9649122807017544
'활동·스터디 > 컴퓨터공학' 카테고리의 다른 글
| 자연어 처리 분야 최신기술! Transformer model, BERT, XLM 모델이란? (0) | 2022.01.05 |
|---|---|
| Fundamentals of C++ Programming/ Richard L. Halterman/ 17.33-17.34 code review (0) | 2021.12.07 |
| 내가 보려고 쓰는 유용한 리눅스 명령어 (0) | 2021.11.18 |
| [Docker] #1. 간단한 DockerFile 만들어서 DockerHub에 올리기 (0) | 2021.10.25 |
| Datacenter, Agile, DevOps, Docker 관련 짧은 설명 및 영상 추천 (0) | 2021.10.12 |